Introduction
Keyboard Shortcuts in After Effects: Stepping into the vibrant world of motion graphics and visual effects, you’ve likely discovered the powerhouse that is Adobe After Effects. It’s a tool that transforms your wildest creative visions into reality. Yet, the complexity of After Effects can sometimes be overwhelming. Here’s where keyboard shortcuts come into play. They’re like the hidden power-ups in a video game—giving you the edge you need to navigate the software with lightning speed. In this all-encompassing guide, we’ll delve into the nuances of mastering keyboard shortcuts in After Effects, ensuring you become a pro in no time. Ready to level up your game? Let’s dive in!
Table of Contents

1. Understanding the Importance of Keyboard Shortcuts
1.1 Why Should You Use Keyboard Shortcuts?
Keyboard shortcuts are your best friends in After Effects. They cut down on repetitive tasks, save precious time, and make your workflow smoother than a well-oiled machine. Imagine slicing through layers, navigating timelines, or applying effects with just a keystroke. Sounds like a dream, right?
1.2 The Learning Curve: It’s Worth It!
Sure, memorizing shortcuts might seem like a chore at first. But trust me, once you get the hang of it, you’ll wonder how you ever worked without them. The initial investment in learning these shortcuts pays off massively in terms of efficiency and speed.
2. Customizing Your Keyboard Shortcuts
2.1 How to Access Shortcut Customization
To make After Effects truly your own, head to Edit > Keyboard Shortcuts. Here, you can tailor the shortcuts to fit your workflow. Personalizing shortcuts can turn After Effects from a daunting software into an intuitive extension of your creative mind.
2.2 Setting Up Your Most-Used Shortcuts
Identify the tasks you perform most frequently and assign shortcuts to them. This personalization can have a profound impact. For instance, if you’re constantly toggling between different tools, setting up a specific shortcut can save you countless clicks.
3. Navigating the After Effects Interface Like a Pro
3.1 Zooming In and Out
In order to properly compose, you must learn how to zoom in and out. Zoom in and zoom out. This makes it easy to scrutinize details or view the bigger picture without losing your flow.
3.2 Moving Around the Timeline
Navigating the timeline efficiently can save you a ton of time. Use Page Up and Page Down to move one frame at a time. For larger jumps, Shift + Page Up and Shift + Page Down move ten frames at a time. To go to the beginning or end of your timeline, simply press Home or End.

4. Managing Layers with Ease
4.1 Selecting and Deselecting Layers
Working with multiple layers can get chaotic. Press V to quickly select a layer, and F2 to deselect all layers. These shortcuts help you keep your project organized and manageable.
4.2 Grouping and Ungrouping Layers
Grouping layers is a great way to keep your project neat. Select your layers and press Ctrl + G (Windows) or Cmd + G (Mac). Press either Cmd + Shift + G or Ctrl + Shift + G to ungroup.

5. Transformations: The Basics and Beyond
5.1 Basic Transformations
After Effects offers shortcuts for basic transformations like position, scale, and rotation. Press P for Position, S for Scale, R for Rotation, T for Opacity, and A for Anchor Point. These shortcuts let you quickly adjust your layers without diving into menus.
5.2 Advanced Transformations
For more advanced transformations like skew or distortion, you might need to rely on plugins or expressions. However, mastering the basics can significantly streamline your workflow.
6. Quick Application of Effects and Presets
6.1 Applying Effects
Applying effects is a core part of working in After Effects. Open the Effects & Presets panel by pressing Ctrl + 5 (Windows) or Cmd + 5 (Mac). Choose your layer and hit Ctrl + Alt + E or Cmd + Option + E to apply an effect.
6.2 Saving and Using Presets
Presets can save you a ton of time. To save a preset, select your effect settings and go to Animation > Save Animation Preset. To apply a saved preset, double-click on it in the Effects & Presets window.
7. Mastering Timelines and Compositions
7.1 Creating and Managing Compositions
Creating a new composition is as simple as pressing Ctrl + N (Windows) or Cmd + N (Mac). To switch between compositions, use Ctrl + Tab or Cmd + `.
7.2 Managing Precomps
Precomps (pre-compositions) are a powerful feature in After Effects. To precompose layers, select them and press Ctrl + Shift + C (Windows) or Cmd + Shift + C. This helps in organizing complex projects.
8. Masking Techniques for Precision
8.1 Creating Masks
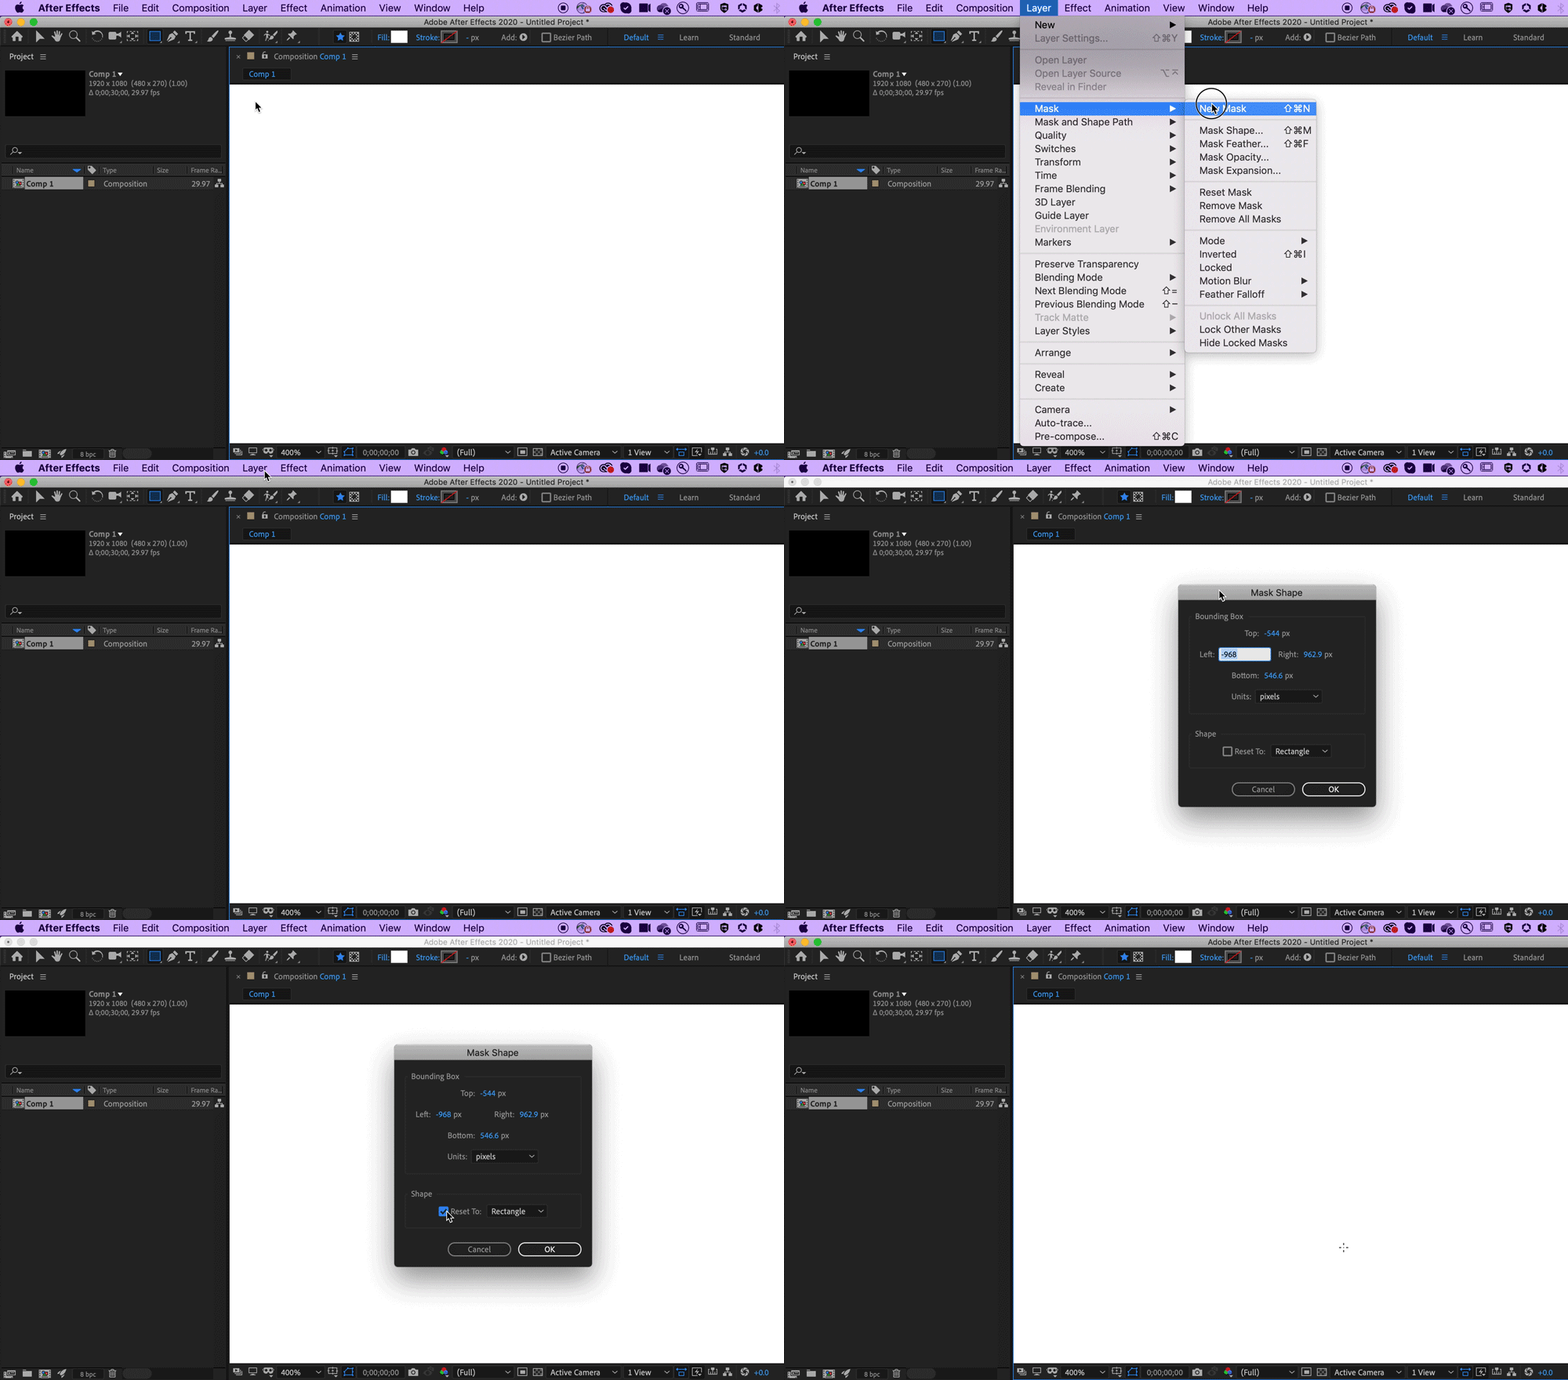
Masks are essential for many effects and transitions. To create a mask, select a layer and press Q. This cycles through different mask shapes (Rectangle, Ellipse, etc.).
8.2 Editing Masks
Once you’ve created a mask, you can adjust its properties with shortcuts. Press MM to reveal all mask properties. To feather a mask, press F. These shortcuts can greatly speed up your masking process.
9. Text and Typography Tricks
9.1 Adding and Editing Text
Text is a crucial element in many projects. To add a text layer, press Ctrl + T (Windows) or Cmd + T (Mac). To edit text properties, use Ctrl + Shift + T or Cmd + Shift + T.
9.2 Animating Text
You may give your projects a dynamic touch by animating text. To reveal text animation properties, press U. This will show all animated properties for the selected layer.

10. Previewing and Rendering Efficiently
10.1 Previewing Your Work
To see how your project looks in motion, you must preview it. Press Spacebar to start and stop a preview. For a RAM preview, which offers smoother playback, press 0 on the numeric keypad.

10.2 Rendering Your Composition
Once you’re happy with your project, it’s time to render. For Windows or Mac, press Ctrl + M to add your composition to the render queue; for Windows, press Cmd + M. To start rendering, press Ctrl + Enter or Cmd + Enter.

11. Utilizing Markers for Better Workflow
11.1 Adding Markers
Markers are great for keeping track of important points in your timeline. To add a marker, press *** (asterisk)** on the numeric keypad. To navigate between markers, use Shift + 1, Shift + 2, etc.
11.2 Editing Markers
To edit a marker, double-click on it. The marker can have comments added, its color changed, and its timings adjusted. This can help in organizing your workflow and making sure you don’t miss any crucial points.
12. Advanced Layer Techniques
12.1 Adjustment Layers
Adjustment layers are powerful tools for applying effects to multiple layers at once. To create an adjustment layer, press Ctrl + Alt + Y (Windows) or Cmd + Option + Y (Mac). This can save you time and keep your compositions organized.
12.2 Null Objects
Null objects act as invisible layers that can be used for parenting and controlling other layers. To create a null object, press Ctrl + Shift + Alt + Y (Windows) or Cmd + Shift + Option + Y (Mac). They are incredibly useful for complex animations.
13. Expressions and Automation
13.1 Basic Expressions
Code snippets called expressions are used to automate aspects of layers. To add an expression, hold Alt (Windows) or Option (Mac) and click the stopwatch next to a property. Then, type in your expression.
13.2 Common Expressions
Some common expressions include:
- Wiggle: wiggle(frequency, amplitude)
- Looping: loopOut(type = “cycle”, numKeyframes = 0)
- Time-based animations: time * speed
14. Using Plugins Effectively
14.1 Installing Plugins
Plugins can extend the functionality of After Effects. To install a plugin, download it from a trusted source and place it in the Plugins folder in your After Effects directory.
14.2 Popular Plugins
Some popular plugins include:
- Element 3D for 3D object rendering
- Trapcode Particular for particle effects
- Optical Flares for realistic lens flares
15. Color Correction and Grading
15.1 Applying Color Correction
Your project’s appearance can be significantly altered using color adjustment. Use Ctrl + Alt + C (Windows) or Cmd + Option + C to apply color correction effects like Curves, Levels, and Color Balance.
15.2 Grading Your Footage
Color grading adds mood and style. Use Lumetri Color by pressing Ctrl + Alt + L (Windows) or Cmd + Option + L. This effect provides powerful color grading tools in a single interface.

16. Working with Audio
16.1 Adding Audio Layers
Audio is just as important as visuals. To add an audio layer, press Ctrl + Alt + A (Windows) or Cmd + Option + A. This lets you import and manage audio files within your project.
16.2 Syncing Audio
Syncing audio with visual elements can be tricky. Use markers and the Ctrl + Shift + D (Windows) or Cmd + Shift + D (Mac) shortcut to split audio layers at specific points.
17. Working with 3D Layers
17.1 Enabling 3D Layers
To enable 3D layers, click the 3D Layer switch in the Timeline panel or press Ctrl + Shift + Y (Windows) or Cmd + Shift + Y (Mac). This adds depth to your project and opens up a world of possibilities.
17.2 3D Camera and Lights
Dynamic effects can be achieved by including a camera or light in your composition. Press Ctrl + Alt + Shift + C (Windows) or Cmd + Option + Shift + C to add a camera, and Ctrl + Alt + Shift + L or Cmd + Option + Shift + L for a light. These tools are essential for creating realistic 3D environments.
18. Parenting and Linking Layers
18.1 Basic Parenting
Parenting allows one layer to control another. Select the child layer, then drag the pick whip to the parent layer or use the Ctrl + Shift + P (Windows) or Cmd + Shift + P (Mac) shortcut. This is useful for complex animations where multiple layers need to move in unison.
18.2 Advanced Linking
For more complex projects, use expressions to link properties. You could use this Comp. layer(“Layer Name”) to connect the rotation of one layer to another, for instance. revolve. This adds a level of automation and precision to your workflow.
19. Time Remapping and Speed Effects
19.1 Enabling Time Remapping
Time remapping allows you to change the timing of a layer. Press Ctrl + Alt + T (Windows) or Cmd + Option + T (Mac) to enable it. This is perfect for creating slow-motion or speed-up effects.
19.2 Speed Adjustments
To adjust the speed of a layer, use the Ctrl + R (Windows) or Cmd + R (Mac) shortcut to enable the Time Stretch feature. After that, you can adjust the speed percentage to get the desired result.
20. Puppet Tool Techniques
20.1 Creating Puppet Pins
The Puppet tool is great for animating characters or shapes. To create puppet pins, select your layer and press Ctrl + P (Windows) or Cmd + P (Mac). This adds control points that you can manipulate to create smooth animations.
20.2 Animating Puppet Pins
After placing puppet pins, use the U shortcut to reveal them in the timeline. You can then animate the pins to create smooth movements. This is particularly useful for character animation.
21. Using Motion Blur
21.1 Enabling Motion Blur
Motion blur adds realism to moving objects. To enable it, click the Motion Blur switch in the Timeline panel or press Ctrl + Alt + B (Windows) or Cmd + Option + B (Mac). This creates a more natural look for your animations.
21.2 Adjusting Motion Blur Settings
You can adjust motion blur settings in the Composition Settings panel (Ctrl + K or Cmd + K). This lets you fine-tune the intensity and quality of the blur effect, ensuring it looks just right for your project.

22. Tracking and Stabilization
22.1 Motion Tracking
To track motion in a clip, select the layer and press Ctrl + Alt + M (Windows) or Cmd + Option + M. By doing this, you can configure your tracking points in the Tracker panel. Motion tracking is essential for integrating elements into live-action footage.
22.2 Stabilizing Footage
Shaky footage can be stabilized using the Warp Stabilizer effect. Apply it by pressing Ctrl + Shift + W (Windows) or Cmd + Shift + W (Mac). This effect smooths out your footage, making it look more professional.
23. Green Screen and Keying
23.1 Applying Keying Effects
Keying is essential for removing green screens. To apply the Keylight effect, press Ctrl + Alt + K (Windows) or Cmd + Option + K. This is crucial for integrating subjects into different backgrounds.
23.2 Fine-Tuning the Key
Fine-tune your keying effect using the Screen Matte and Clip Black/White properties. This ensures a clean removal of the green screen background, making your composite look seamless.
24. Advanced Composition Techniques
24.1 Nesting Compositions
Nesting compositions helps in organizing complex projects. Select your layers and press Ctrl + Shift + C (Windows) or Cmd + Shift + C to precompose them. This is great for managing large projects with multiple elements.
24.2 Using Adjustment Layers
All layers below adjustment layers receive effects from them. Create one by pressing Ctrl + Alt + Y (Windows) or Cmd + Option + Y (Mac). This allows you to apply effects globally without affecting individual layers.
25. Utilizing the Graph Editor
25.1 Opening the Graph Editor
The Graph Editor offers fine-grained control over curves used in animation. Open it by pressing Shift + F3. This tool is essential for creating smooth, natural animations.
25.2 Editing Speed Graphs
In the Graph Editor, you can edit speed graphs to create smooth, natural animations. Use the Bezier handles to adjust the velocity of keyframes, adding a level of polish to your work.
26. Project Management
26.1 Organizing the Project Panel
A well-organized Project panel saves time. Use Ctrl + Alt + P (Windows) or Cmd + Option + P to create folders and organize your assets. Your project stays functional and well-organized as a result.
26.2 Using the Collect Files Feature
To gather all files used in your project, use the Collect Files feature by pressing Ctrl + Alt + C (Windows) or Cmd + Option + C. This ensures you have all necessary files for rendering or transferring the project.
27. Customizing the Workspace
27.1 Saving Workspace Layouts
Customizing and saving workspace layouts can enhance your efficiency. Press Ctrl + Shift + Alt + K (Windows) or Cmd + Shift + Option + K to save your current layout. This ensures you have your preferred setup ready at all times.
27.2 Resetting to Default Workspace
If you need to reset to the default workspace, press Ctrl + Shift + Alt + D (Windows) or Cmd + Shift + Option + D. This can help if your workspace becomes cluttered or disorganized.
28. Tips for Efficiency and Creativity
28.1 Using Templates and Presets
Presets and templates can inspire and save time. Explore the available options in the Effects & Presets panel (Ctrl + 5 or Cmd + 5). This allows you to quickly apply complex effects without starting from scratch.
28.2 Learning from the Community
The After Effects community is vast and supportive. Join forums, watch tutorials, and participate in discussions to continuously improve your skills. Engaging with the community can provide new ideas and techniques.
29. Hotkeys for Common Tools
29.1 Selection and Move Tools
Press V to select the Selection tool and W for the Rotate tool. These are your go-to tools for manipulating layers.
29.2 Pen and Shape Tools
The keys to toggle between the Pen and Shape tool options are G and Q, respectively.
Mastering these tools is essential for creating custom shapes and masks.
30. Workflow Enhancements
30.1 Undo and Redo Actions
Mistakes happen, and undoing them is crucial. Press Ctrl + Z (Windows) or Cmd + Z (Mac) to undo, and Ctrl + Shift + Z or Cmd + Shift + Z to redo.
30.2 Locking and Hiding Layers
To lock a layer, press Ctrl + Shift + L (Windows) or Cmd + Shift + L (Mac). Use Ctrl + Shift + H or Cmd + Shift + H to hide a layer. These quick access points assist in maintaining a tidy environment.
31. Using Expressions for Automation
31.1 Basic Expression Examples
Basic expressions can automate tedious tasks. For example, wiggle(2, 50) makes a layer wiggle randomly.
31.2 Expression Controls
Add expression controls to layers by pressing Ctrl + Shift + E (Windows) or Cmd + Shift + E (Mac). This allows for easy adjustments of complex expressions.
32. Integrating with Other Adobe Tools
32.1 Dynamic Link with Premiere Pro
Use Dynamic Link to integrate with Premiere Pro. Press Ctrl + Alt + P (Windows) or Cmd + Option + P to open a Premiere project within After Effects.
32.2 Using Photoshop Files
Use the keys Ctrl + I (Windows) or Cmd + I (Mac) to import Photoshop files. This allows for seamless integration of layered graphics.
33. Performance Optimization
33.1 Purging Memory and Disk Cache
If After Effects slows down, purge memory and disk cache by pressing Ctrl + Alt + / (Windows) or Cmd + Option + / (Mac). This clears temporary files and improves performance.
33.2 Reducing Preview Resolution
Lowering preview resolution can speed up your workflow. Press Ctrl + Shift + J (Windows) or Cmd + Shift + J to toggle between Full, Half, and Quarter resolution.
34. Exporting and Sharing
34.1 Exporting with Media Encoder
Export compositions with Media Encoder by pressing Ctrl + Alt + M (Windows) or Cmd + Option + M. This offers improved performance and additional export options.
34.2 Sharing Projects
To share projects with collaborators, use the Collect Files feature (Ctrl + Alt + C or Cmd + Option + C). This ensures all assets are included and organized.
35. Troubleshooting Common Issues
35.1 Resolving Render Errors
Render errors can be frustrating. Common fixes include clearing the cache (Ctrl + Alt + / or Cmd + Option + /) and updating plugins.
35.2 Handling Crashes
After Effects can sometimes crash. Save your work frequently (Ctrl + S or Cmd + S) and enable auto-save in preferences.
FAQs : Keyboard Shortcuts in After Effects
What are the most crucial keyboard shortcuts in After Effects?
Some of the most important shortcuts include:
- Spacebar: Play/stop preview
- P: Position; S: Scale; R: Rotation; T: Opacity; A: Anchor Point
- Ctrl + N (Cmd + N): New composition
- Ctrl + M (Cmd + M): Add to render queue
How can I customize my keyboard shortcuts in After Effects?
To modify your keyboard shortcuts, select Edit > Keyboard Shortcuts. This allows you to tailor After Effects to your workflow.
What’s the best way to learn After Effects shortcuts?
Practice is key. Make frequent use of shortcuts and think about making a cheat sheet for future use. They will become automatic with time.
Conclusion
Mastering keyboard shortcuts in After Effects transforms your workflow, making it more efficient and enjoyable. With practice and customization, these shortcuts become powerful tools in your creative arsenal. So, go ahead—start integrating them into your projects and watch your productivity soar. Happy animating!







Thanks for sharing. I read many of your blog posts, cool, your blog is very good.
Thanks for sharing. I read many of your blog posts, cool, your blog is very good.
I don’t think the title of your article matches the content lol. Just kidding, mainly because I had some doubts after reading the article. https://accounts.binance.com/bg/register-person?ref=V2H9AFPY