VPN Connection Fixes for Google Chrome : VPN (Virtual Private Network) is a crucial tool for creating secure connections over the internet, enabling users to access local network resources from anywhere. However, like any technology, VPNs can encounter issues, particularly when used with Google Chrome. In this comprehensive guide, we’ll explore nine effective ways to troubleshoot and fix VPN connection problems in Chrome.
Table of Contents
Do You Have Chrome VPN Issues?
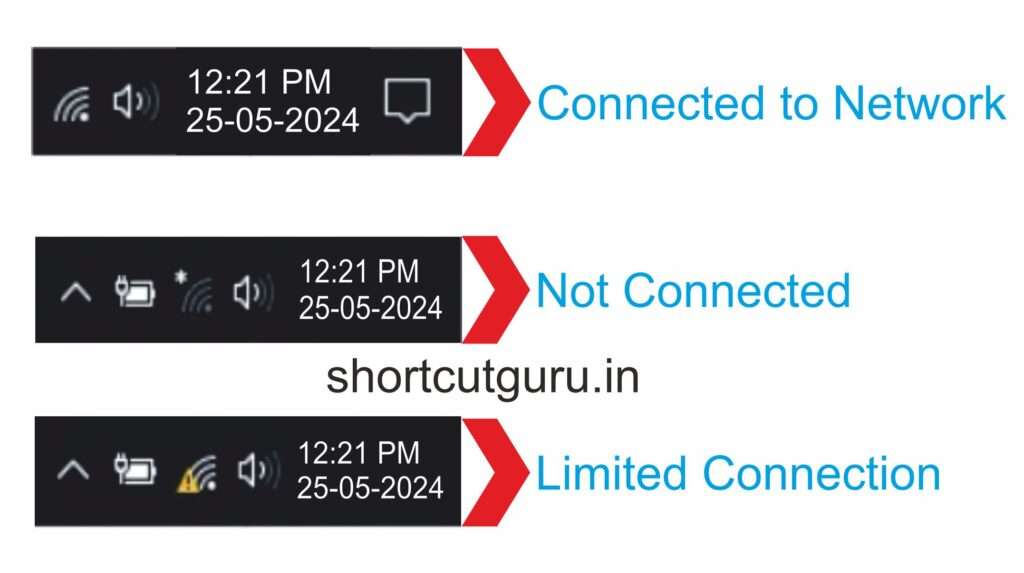
Before diving into specific solutions, it’s essential to ensure that the problem lies with the VPN connection rather than a general network issue. Here’s how to check:
- Verify Internet Connection: Ensure your computer is connected to the internet. On Windows, check the system tray at the bottom right of the screen; on Mac, check the top Apple menu bar for the WiFi icon.
- Limited Access: A warning or exclamation symbol on the network icon indicates limited or no internet access. Resolve this first before addressing VPN issues.
If you can access webpages without the VPN, the problem is likely with Chrome or the VPN itself. Here are nine solutions to try:
1. Erase Browsing Data (History, Cache, and Cookies)
Accumulated browser data can interfere with VPN connections. Clearing this data can help:
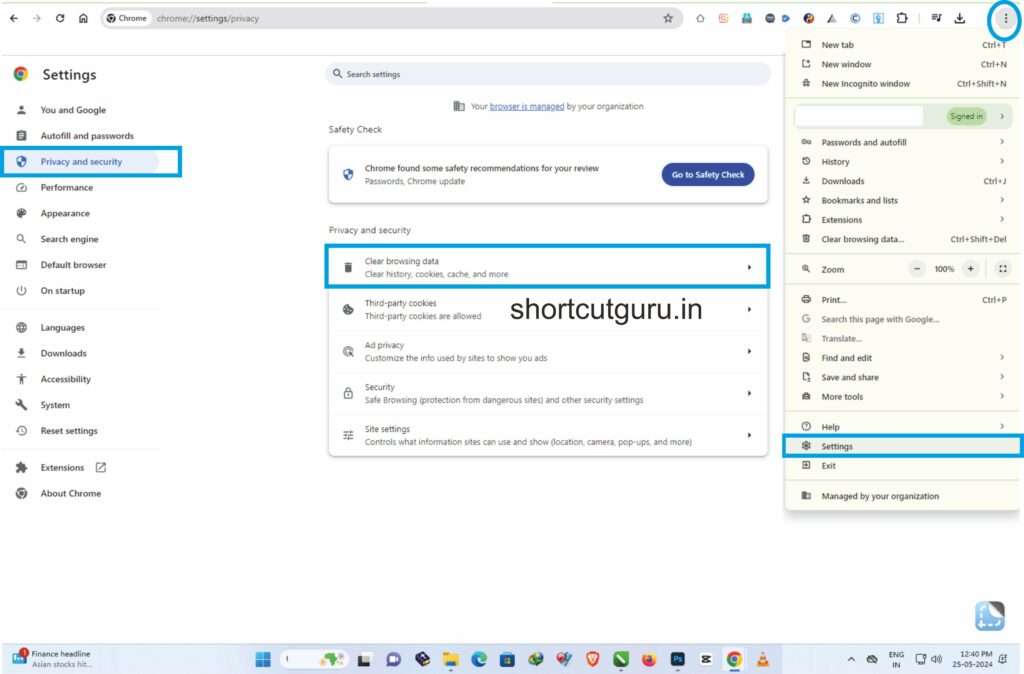
- Click the Chrome menu icon (three vertical dots) and select Settings.
- Navigate to the Privacy and Security section and choose the option to Clear browsing data to manage your cookies and other browsing data effectively.
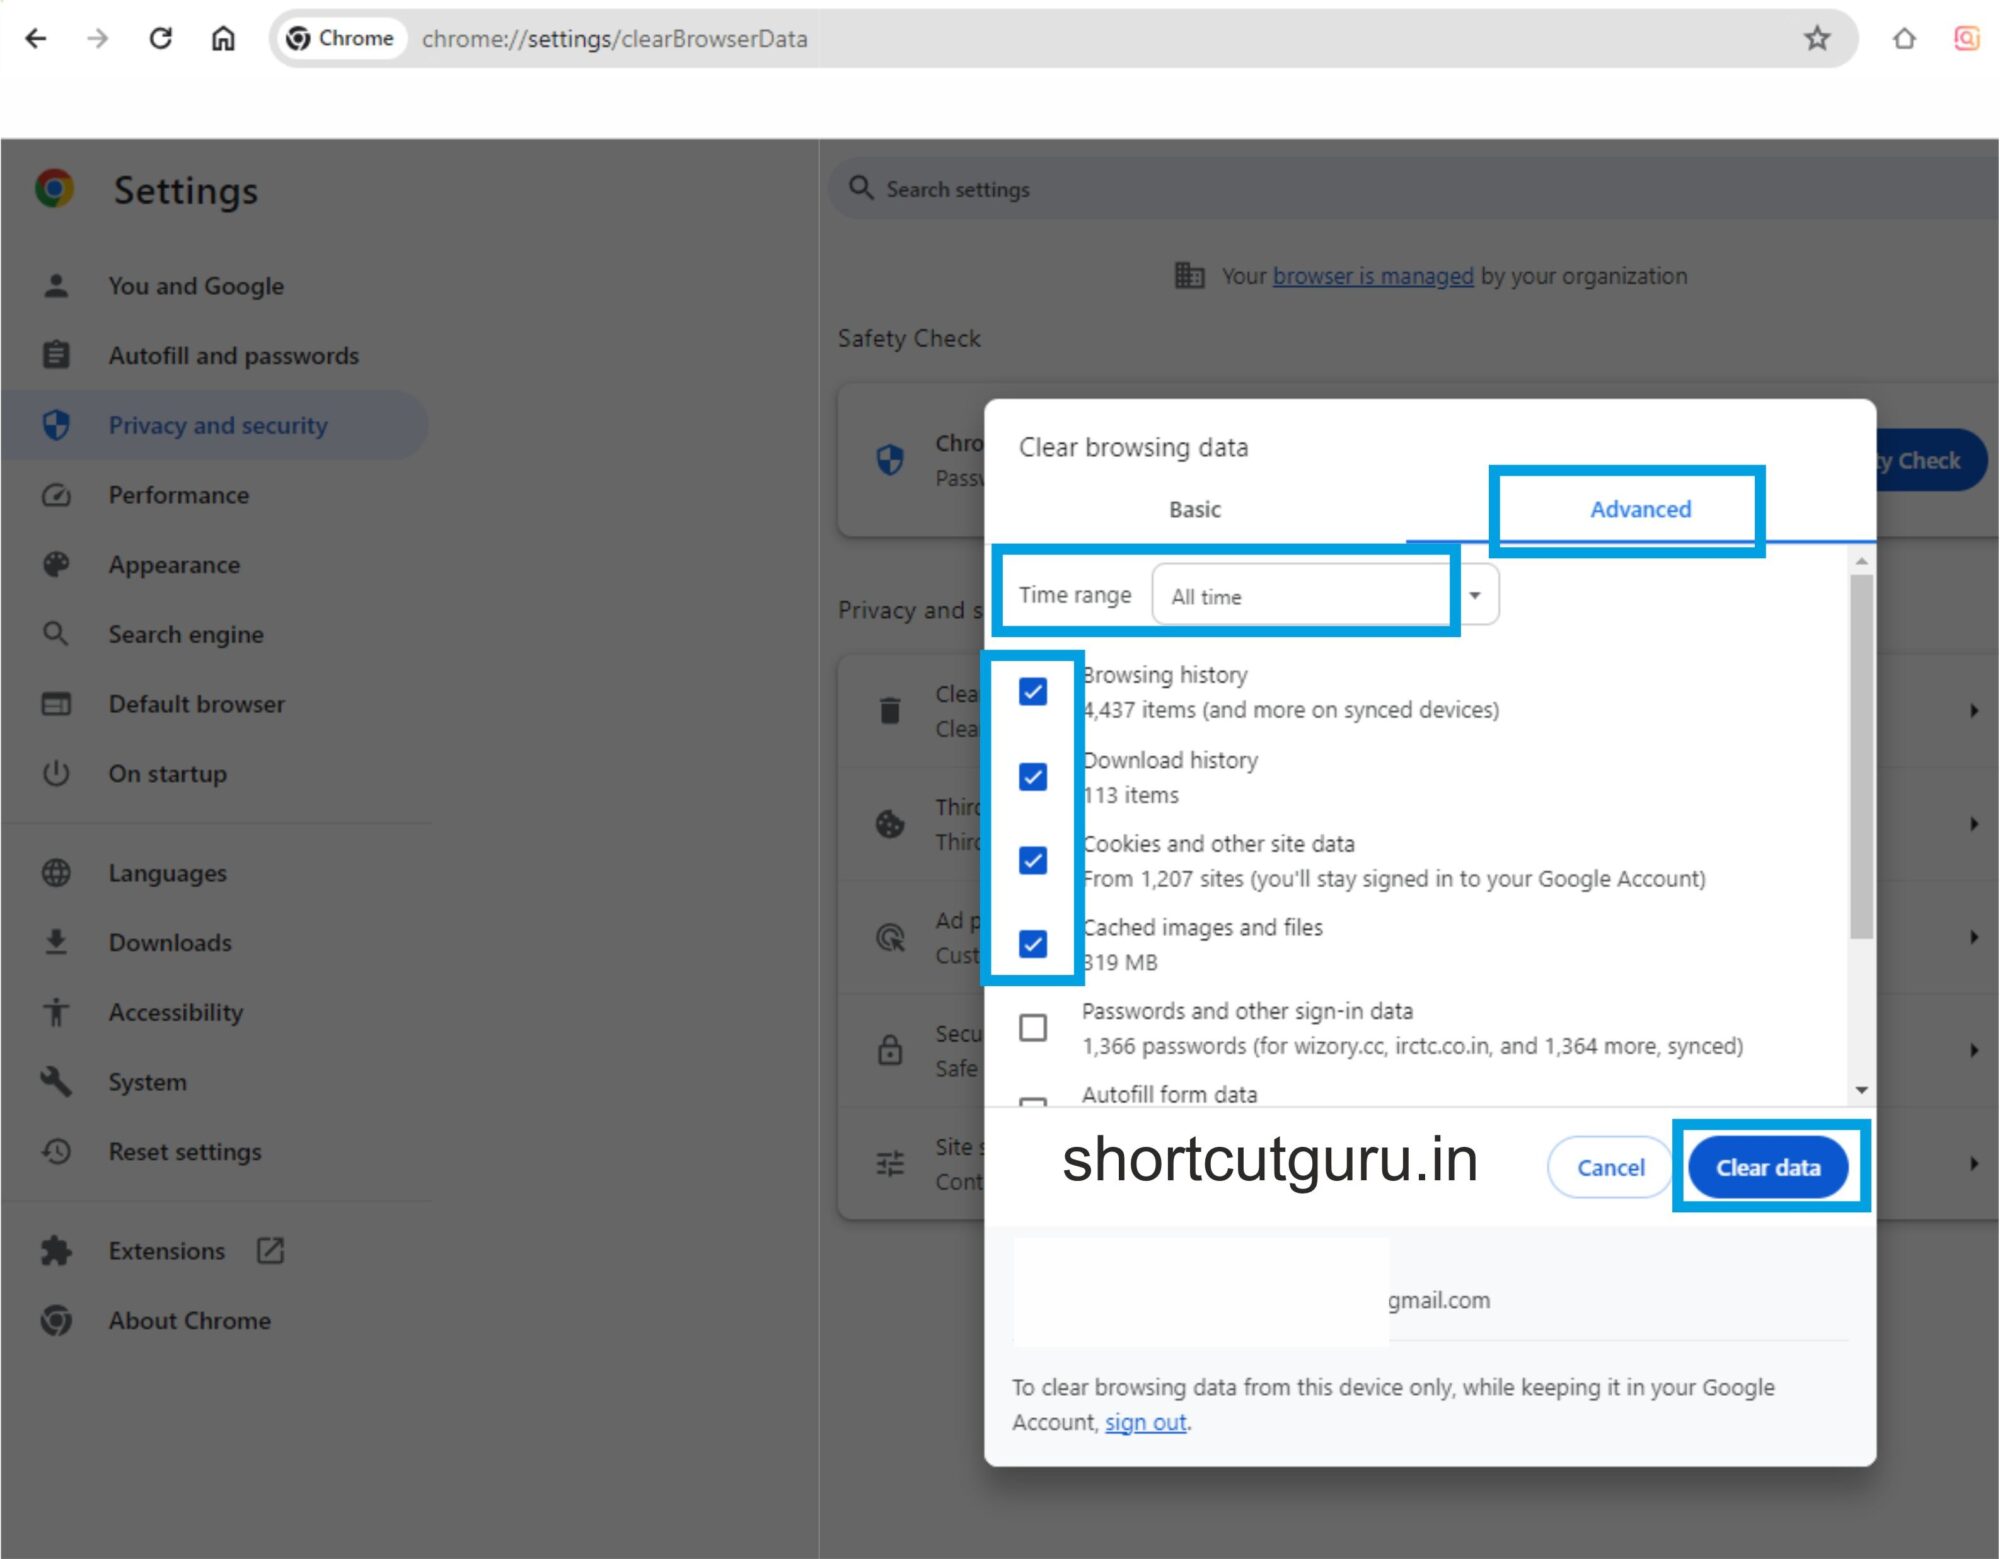
- Select “All time” as the time range in the Advanced tab to specify the duration for your search.
- Ensure Browsing history, Download history, Cookies and other site data, and Cached images and files are checked.
- Click Clear data, then restart Chrome.
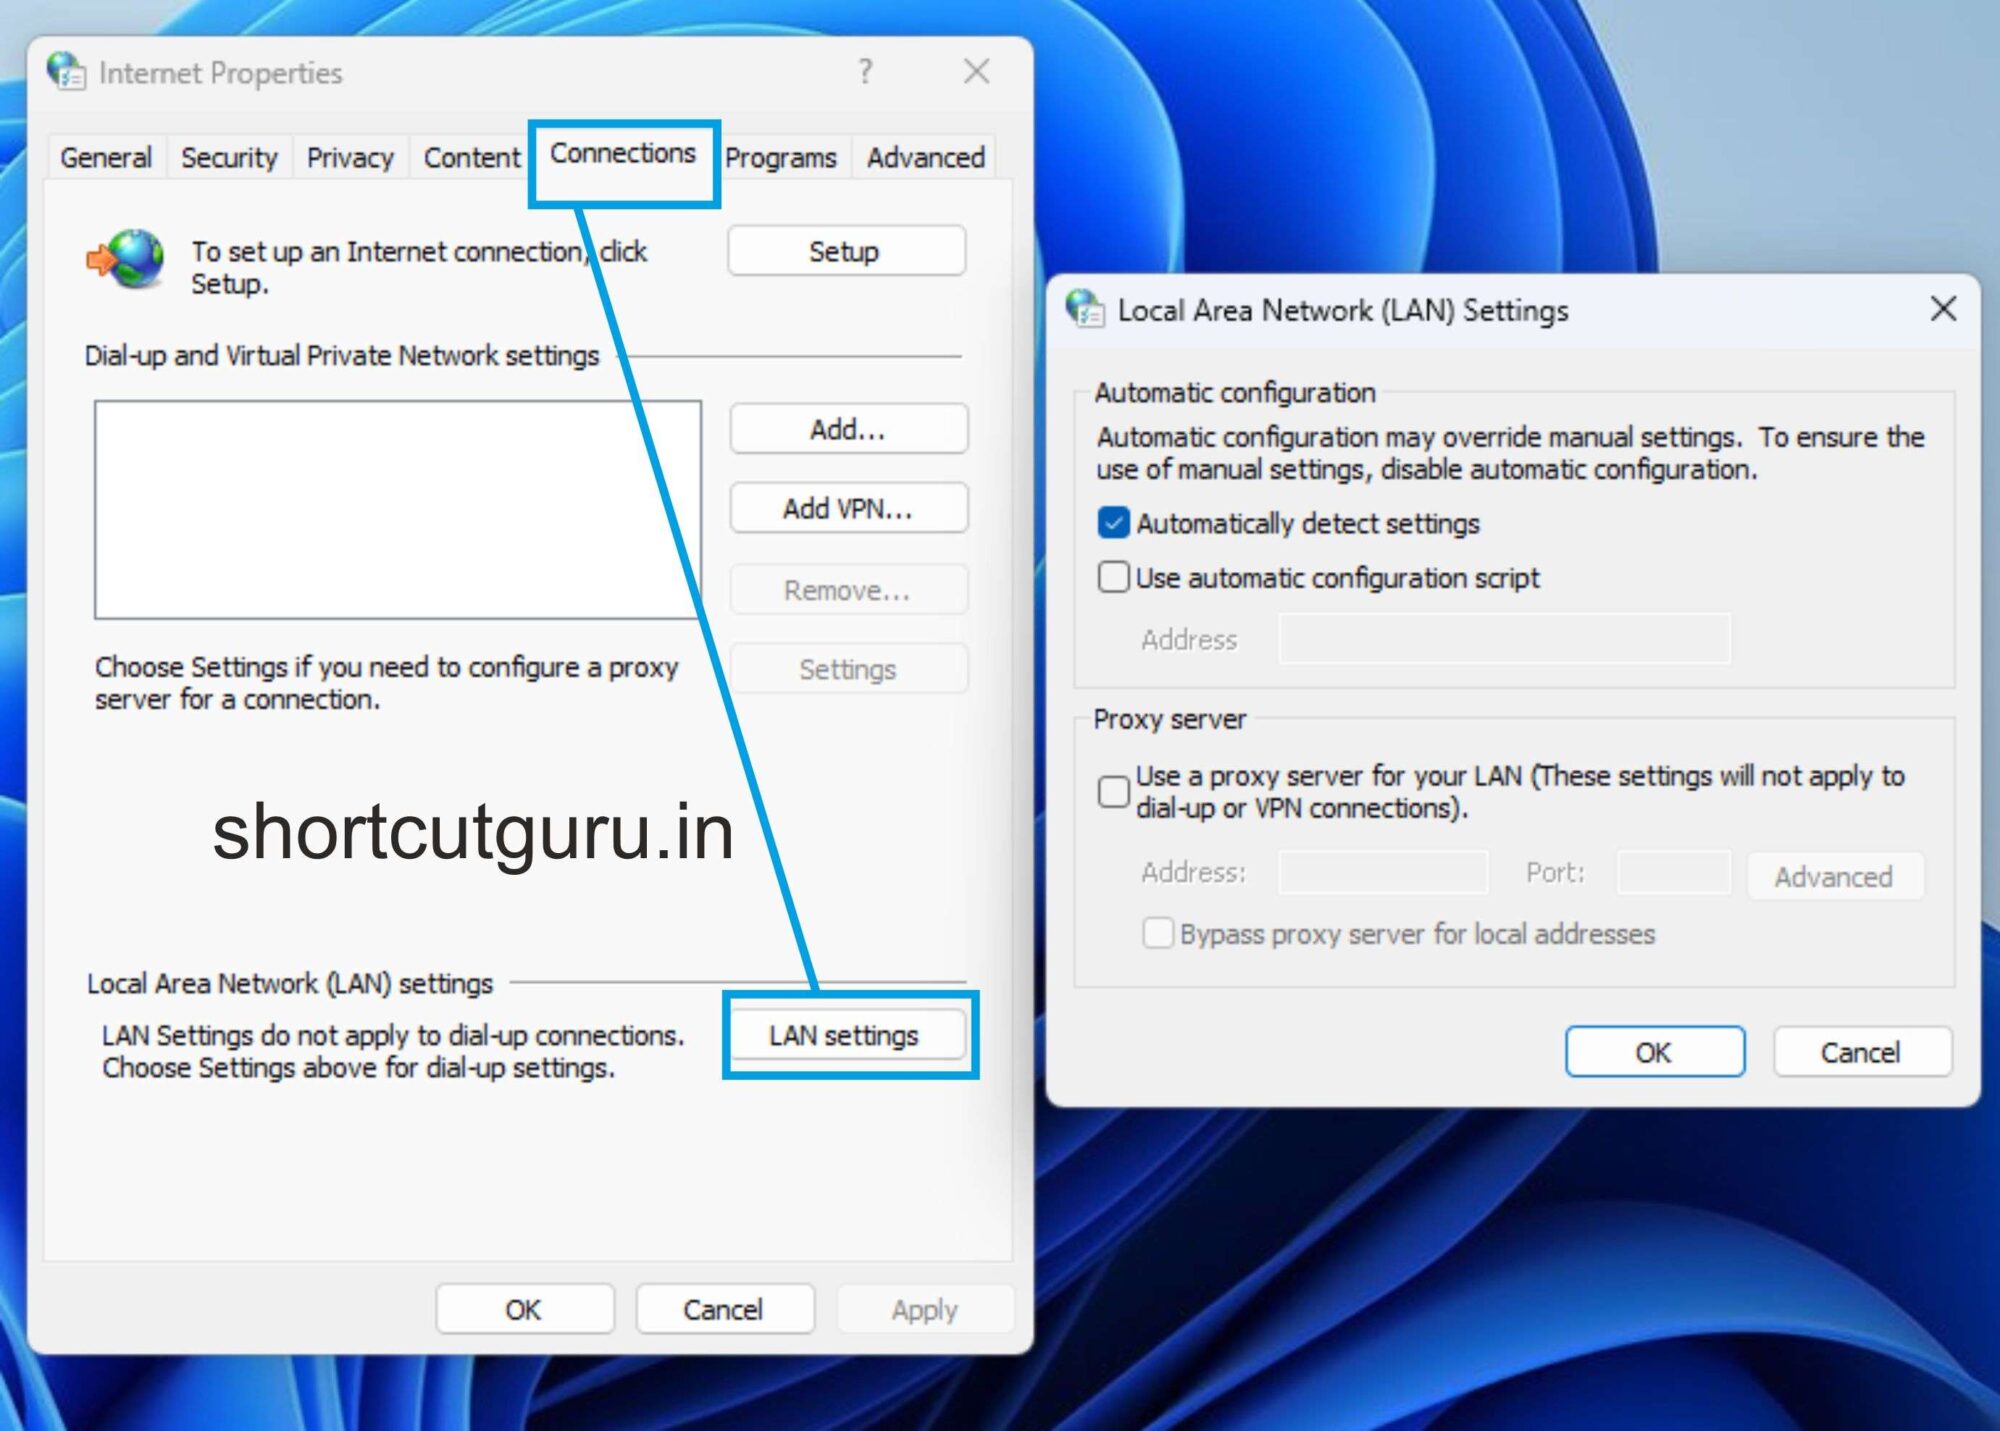
2. Turn Off Proxy Server
Conflicts between VPNs and proxy servers can cause connection issues. Disable the proxy settings:
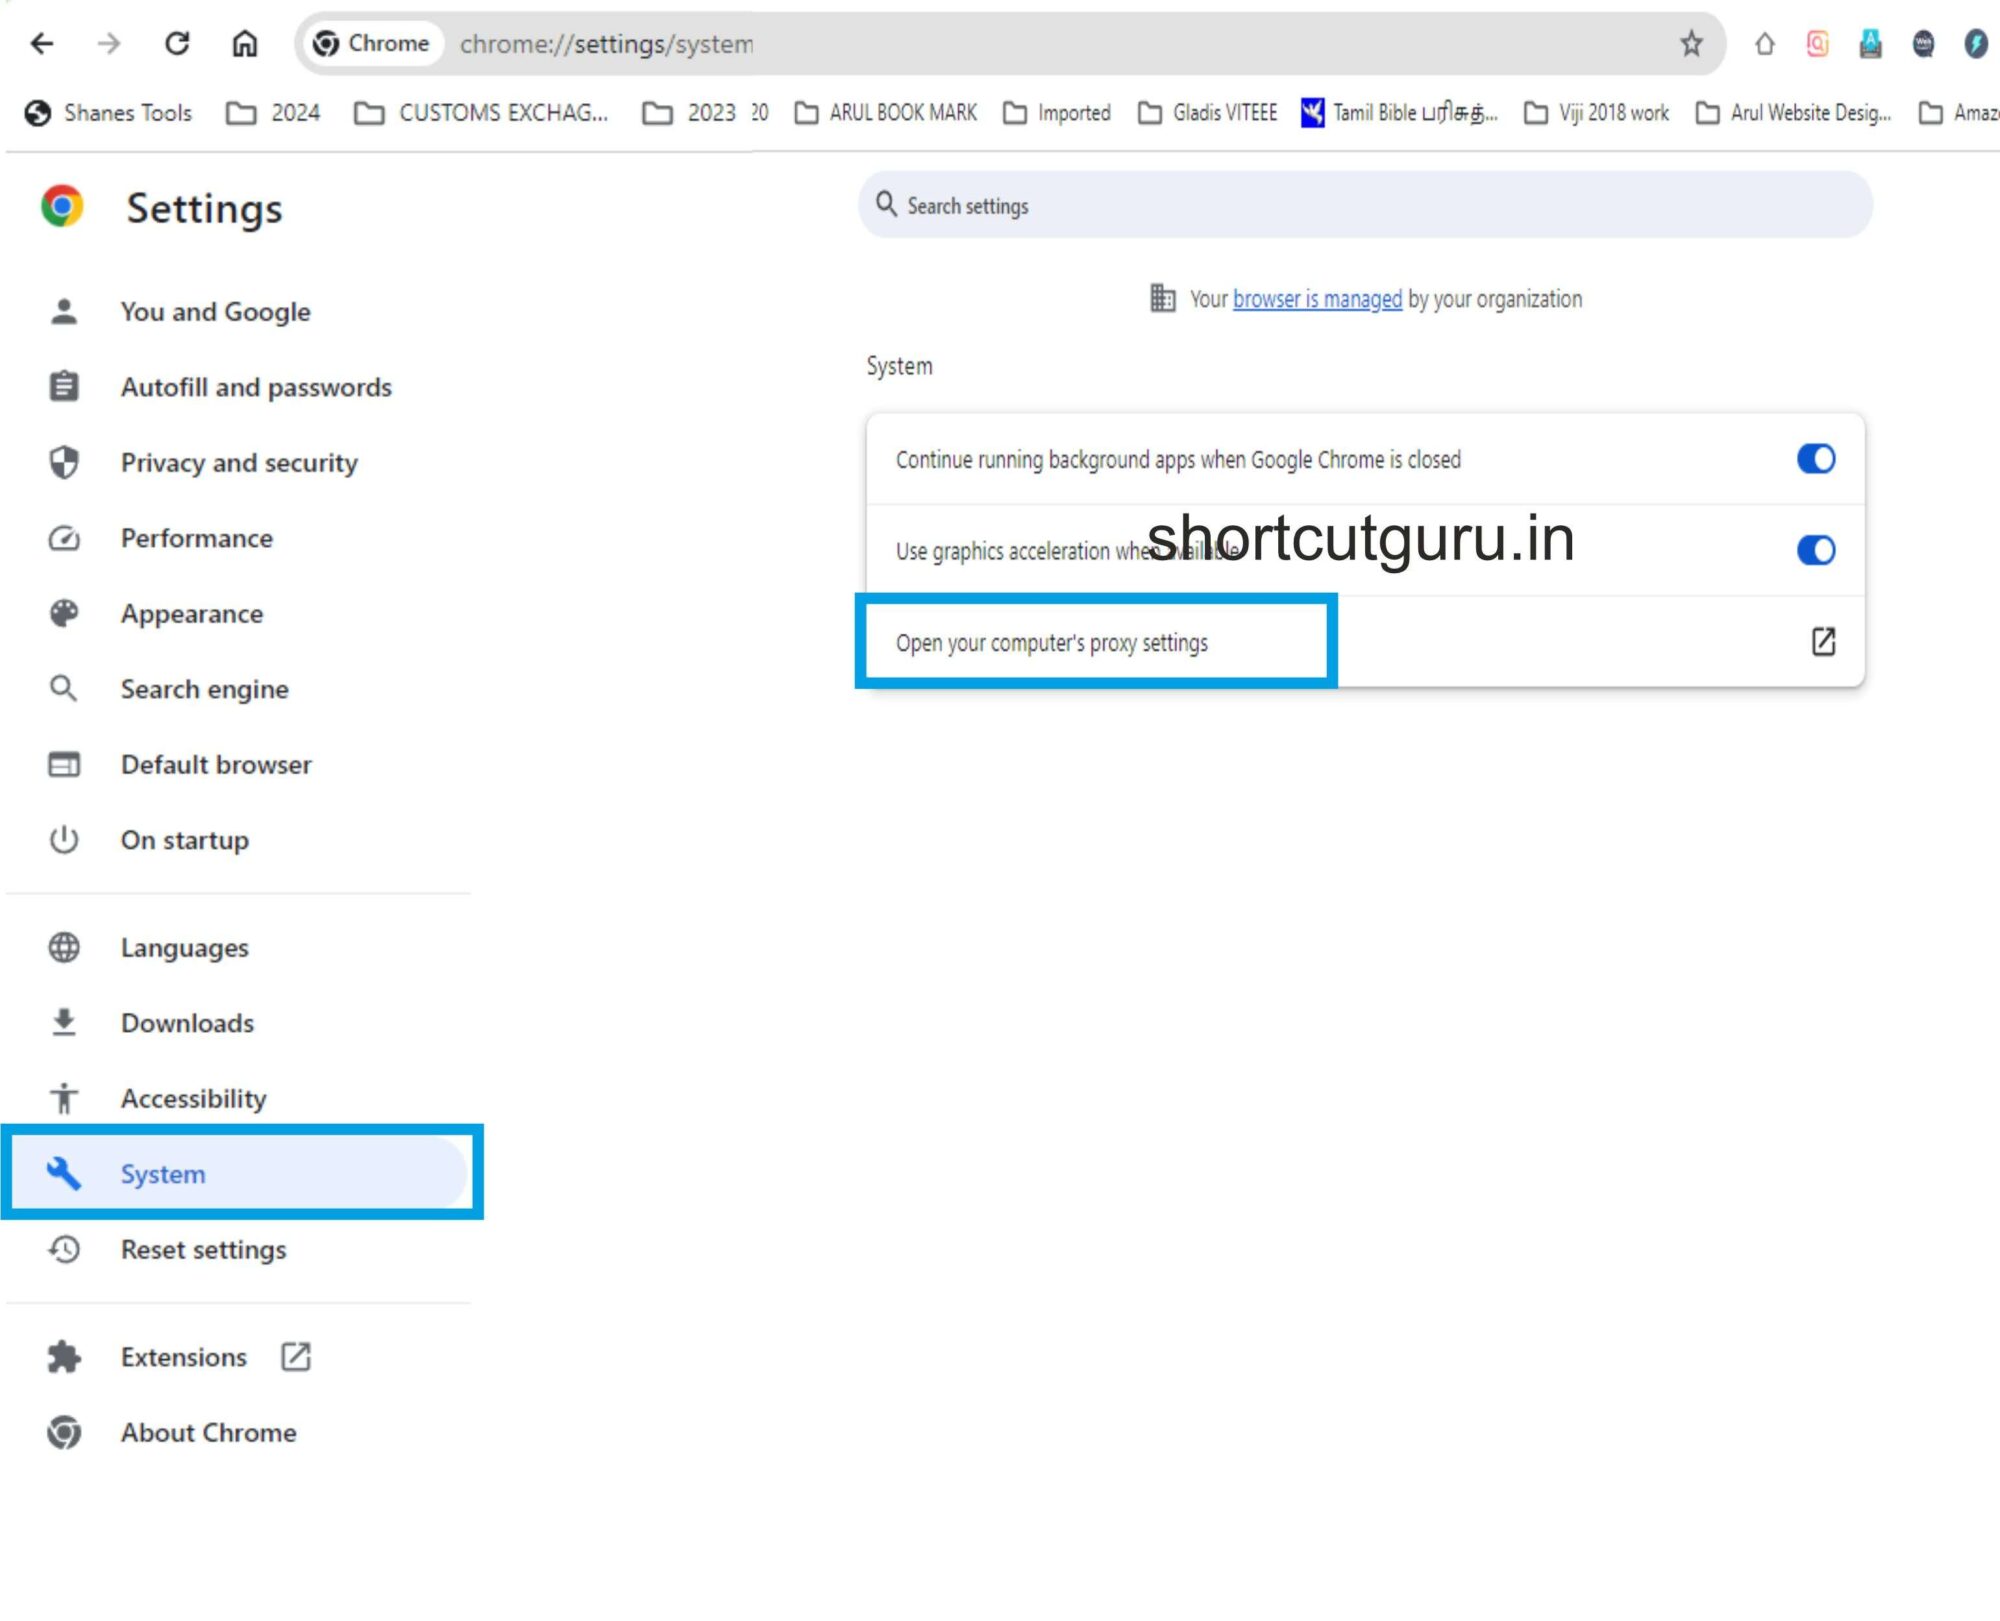
- Go to chrome://settings/ and click on System.
- Click Open your computer’s proxy settings.
- In the Internet Properties dialog (Windows), go to the Connections tab, click LAN settings, and uncheck all options.
- For Mac, disable all options under the Proxies tab in Network settings.
Reconnect your VPN and relaunch Chrome.
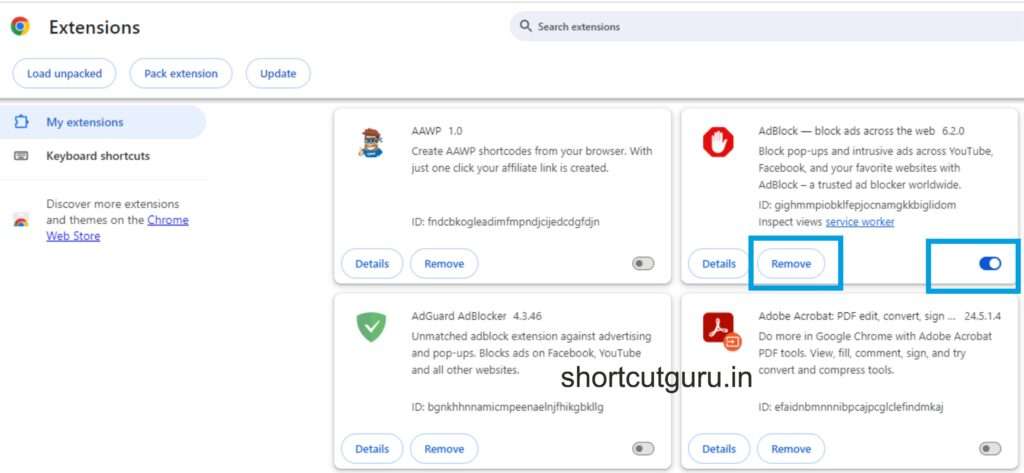
3. Disable Chrome Extensions
Certain extensions can interfere with VPNs. Disable or remove any problematic extensions:
- Enter chrome://extensions into the address bar and then hit enter to access the extensions management page in Google Chrome.
- Identify network, privacy, and security-related extensions (including ad blockers).
- Turn off the toggle button or click Remove to uninstall the extension.
- Restart Chrome and try reconnecting.
You can also test in Incognito mode, which disables extensions by default.
4. Clear DNS Server Cache (DNS Flush)
An outdated DNS cache can cause VPN connection issues. Clear it in Chrome:
- Type chrome://net-internals/#dns in the address bar and press enter.
- Click Clear host cache.
Learn how to flush DNS on Windows and Mac for more comprehensive solutions.
5. Deactivate Antivirus/Firewall or Whitelist Chrome/VPN Apps
Antivirus and firewall settings can block VPN connections. Adjust these settings:
- Access Windows Security using the search bar to navigate quickly to the security settings on your Windows system.
- Navigate to Firewall & network protection and select the option to allow an app through the firewall to customize your network settings.
- Click Change settings, find Chrome and your VPN app, and check both private and public network boxes.
- Click OK to apply changes.
On Mac, allow Chrome and VPN apps in firewall settings. Temporarily disable real-time protection in your antivirus software if necessary.
6. Use Secure DNS
Switching to secure DNS can resolve connection issues:
- Navigate to the Settings menu > Privacy and security > Security.
- Enable Use secure DNS.
- Select Google (Public DNS) or another preferred option.
You can also revert to your ISP/VPN DNS servers if secure DNS doesn’t help.
7. Update the VPN app and select the appropriate server
Ensure your VPN app is up-to-date:
- Ensure your VPN app is up-to-date by installing the latest version available.
- Choose a reliable server. VPN companies offer multiple servers, but only a few are stable. Consult your service provider to select the best server.
8. Check Network Lock
Network lock features can block internet access when the VPN connection drops. Adjust these settings:
- In your VPN app, disable the network lock option if connecting through your ISP is acceptable.
9. Check VPN Protocol
Change the VPN connection protocol if it’s set to auto mode:
- Select different protocols like Aegis, oTCP, oUD, IKEv2, or IPSec to find the one that works best.
Conclusion : VPN Connection Fixes for Google Chrome
VPNs are essential for secure, anonymous internet use and accessing restricted sites. However, they may occasionally cause conflicts with Chrome and system settings, resulting in connection problems. By following the above nine solutions, you can troubleshoot and resolve most VPN connection problems in Google Chrome. We hope these tips help you achieve a stable and secure VPN connection. Happy browsing!


Subject: Unleash the Power of Your Business with GoHighLevel!
Dear Entrepreneurs and Business Leaders,
Are you ready to revolutionize the way you run your business? Say hello to GoHighLevel – the all-in-one platform that will elevate your business to new heights and empower you with the tools you need to succeed!
Picture this: seamlessly managing your entire customer journey from a single, intuitive dashboard. No more juggling between different platforms or drowning in a sea of confusing spreadsheets. With GoHighLevel, you can streamline your processes and focus on what truly matters – growing your business.
From generating high-converting leads to nurturing them into loyal customers, GoHighLevel has got you covered. Build stunning landing pages that leave a lasting impression, create captivating email campaigns that engage and convert, and effortlessly manage your appointments with a smart scheduling system that syncs with your calendar.
But that’s not all – GoHighLevel’s versatility knows no bounds! Whether you’re in the business of coaching, consulting, marketing, or any other industry, our platform adapts to your unique needs. Experience the convenience of managing your SMS marketing, social media, and even client pipelines all under one roof.
Worried about your business scaling to new heights? Fear not! GoHighLevel is designed with growth in mind. With advanced analytics and performance tracking, you’ll gain valuable insights into your business’s performance and make data-driven decisions for continued success.
Our user-friendly interface ensures that you don’t need to be tech-savvy to make the most of our platform. Say goodbye to complexities and embrace the simplicity of GoHighLevel!
As a special offer for our valued customers, we’re thrilled to provide a 30-day free trial of GoHighLevel. Yes, you read that right – an entire month to experience the transformative power of our platform, risk-free!
Join thousands of businesses worldwide who have already witnessed the magic of GoHighLevel and achieved unparalleled growth and success. Don’t be left behind – take the leap and go beyond your limits with GoHighLevel!
Ready to embark on a journey of business excellence? Head over to http://www.gohighlevel.com and sign up for your free trial today.
Empower your business, elevate your success – GoHighLevel awaits you!
To your success,
GoHighLevel lover
try it from here ==>> https://rebrand.ly/14-day-trial-hl
Hello,
Are you looking to access exclusive deals on top-tier software and tools to grow your business? Discover AppSumo, the leading platform that connects entrepreneurs and small business owners with the best deals on essential software.
AppSumo offers a wide range of software deals that cater to the needs of startups, freelancers, and growing businesses. Whether you’re looking for marketing tools, productivity software, or development platforms, AppSumo provides access to premium software at unbeatable prices.
By choosing AppSumo, you’ll gain access to a curated selection of tools designed to enhance your business operations and drive success. Join thousands of entrepreneurs who trust AppSumo to deliver the best software deals and support their growth journey.
Don’t miss out on these exclusive deals. Start exploring AppSumo today and empower your business with the right tools:
https://best-digital-tools.com/short/appsumo
Best regards,
Sophia
AppSumo Team
Imagine being able to handle thousands of customer calls simultaneously, 24/7
while significantly reducing costs and improving satisfaction. With AiQuickCalls.COM?f=gsa, this is now a reality.
Our advanced AI-powered phone agents are transforming customer service:
• 24/7 Availability: Never miss a call or opportunity
• Scalability: Handle 10 to 10,000+ calls simultaneously
• Efficiency: Reach millions of potential clients in days
• Cost-Effective: Streamline operations and reduce overhead
We’ve already processed over 200 million phone contacts across the US and Canada.
Whether you use our extensive database or your own contact list, we can tailor a solution for your industry.
Curious to try out our virtual assistant?
Order from our Demo Virtual Gina’s Pizza restaurant today!
Call (518) 666-7037 now!
Thank you and have a great day,
Best regards,
Archie Faulding
AiQuickCalls
P.S. Companies using conversational AI are seeing up to $439 billion in annual cost savings.
Don’t get left behind – let’s chat about how you can leverage this game-changing technology.
I’m providing a free site review
to pinpoint sections for betterment.
By addressing these, you can climb further up in Google search results,
leading to more traffic and sales.
Furthermore, I’ll fix one issue for free! Interested?
Reply to get one of the restricted places for this exclusive offer.
Just put in the subject “interested”.
If you want to talk you can reach me anytime at (858) 356 4880
You can also checkout my site at
Regards,
Danny
Hi there,
We’re based in beautiful Del Mar, California, and we leverage
cutting-edge AI to rank our clients at the top of Google search results.
Here’s what we offer:
SEO: Local, National, and Global
50 DR Domain Ratings
Massive Backlink Building
Google Penalty Removal
GMB (Google Maps) SEO
SEO Landing Pages
Web Design and Development
Mass Email Marketing
Mass Lead Generation: Targeted leads, like sending your info to thousands of potential clients
Our main goal is to get your website to the top of Google search, where the real money is.
If you’re not on page 1 for all your keywords, you’re missing out.
We can boost your website’s domain rating to a 50 DR!
Have questions or want to get started? Just reply with “Interested” or visit our website.
https://www.Rockstarseo.tech
You can also text or call me at (858) 356 4880
Beste Regards,
Dan Bradshaw
Dad gets First Sale on Day #1 (Unfair Software)
This is one of the coolest things I have ever seen…
Chris Got his First Sale Ever on the first day
(Using this new unfair tool) https://rebrand.ly/tryfunnelfreedom
More on that in a bit….
Most spend years trying to figure out this online thing and struggling with tech, funnels and things that beginners have no idea how to do…
So how the HECK did Chris get a sale on his first day, and hes
absolutely horrible with technology…
He took advantage of a new UNFAIR Software that allowed him to start promoting multiple products in seconds…
Check out this demo on Chris was able to get his First Sale Using This Unfair Software https://rebrand.ly/tryfunnelfreedom
Have an amazing Day,
tareq qteshat
I store Tether in my OKX wallet and have my seed phrase (clean party soccer advance audit clean evil finish tonight involve whip action). How can I transfer this amount to Binance?
Can you be more specific about the content of your article? After reading it, I still have some doubts. Hope you can help me. https://accounts.binance.com/de-CH/register?ref=UM6SMJM3
I don’t think the title of your article matches the content lol. Just kidding, mainly because I had some doubts after reading the article.
Howdy from DreamProxies.com
Amazing news: high-quality, ultra speed and trusted private proxies now even cheaper: 50% SALE – FOR ALL PRIVATE PROXIES!
View proxies offers and sales – https://tiny.cc/DreamProxies-Offer
Key features and benefits that come with all proxies pack on DreamProxies.com:
Total privacy – Fully private and anonymous premium proxy servers
Ultimate quality – Highest premium quality and reliability with each proxy package
Lightning-fast speed – Up to 1,000 mb/s per proxy – high-speed servers
No limits on usage – Unlimited bandwidth and complete freedom using proxies
Reliable servers – Fully-powered stable American datacenter proxy servers
Cheap Prices – Among the cheapest proxy services you can find on the market
Bonus discounts – Special coupons and offers for proxies on website
50% OFF for all proxies packages – by DreamProxies.com
Your point of view caught my eye and was very interesting. Thanks. I have a question for you.
Hello
Claim Your $447K AI-Powered Business Today
Access a fully built, AI-powered business valued at $447K—designed to generate up to $417.95 per sale. No tech skills or hard work required.
Interested in unlocking this done-for-you income stream?
Want in => https://rb.gy/mv6qbh
Best regards
Cassandra
If you wish to unsubscribe, please reply to this email.
Dad gets First Sale on Day #1 (Unfair Software)
This is one of the coolest things I have ever seen…
Chris Got his First Sale Ever on the first day
(Using this new unfair tool) https://rebrand.ly/tryfunnelfreedom
More on that in a bit….
Most spend years trying to figure out this online thing and struggling with tech, funnels and things that beginners have no idea how to do…
So how the HECK did Chris get a sale on his first day, and hes
absolutely horrible with technology…
He took advantage of a new UNFAIR Software that allowed him to start promoting multiple products in seconds…
Check out this demo on Chris was able to get his First Sale Using This Unfair Software https://rebrand.ly/tryfunnelfreedom
Have an amazing Day,
tareq qteshat
Hello
Claim Your $447K AI-Powered Business Today
Access a fully built, AI-powered business valued at $447K—designed to generate up to $417.95 per sale. No tech skills or hard work required.
Interested in unlocking this done-for-you income stream?
Want in => https://rb.gy/mv6qbh
Best regards
Arielle
If you wish to unsubscribe, please reply to this email.
Hello
Claim Your $447K AI-Powered Business Today
Access a fully built, AI-powered business valued at $447K—designed to generate up to $417.95 per sale. No tech skills or hard work required.
Interested in unlocking this done-for-you income stream?
Want in => https://rb.gy/mv6qbh
Best regards
Joey
If you wish to unsubscribe, please reply to this email.
Learn how to make $1000 a day from copy and past videos
https://rebrand.ly/Jet-Video-Academy-2023
Hello
Claim Your $447K AI-Powered Business Today
Access a fully built, AI-powered business valued at $447K—designed to generate up to $417.95 per sale. No tech skills or hard work required.
Interested in unlocking this done-for-you income stream?
Want in => https://rb.gy/mv6qbh
Best regards
Keith
If you wish to unsubscribe, please reply to this email.
At SilkLinks.online, we believe premium digital products should be accessible, instant, and affordable — no subscriptions, no delays, no nonsense.
From creating stunning designs with Canva Pro and Adobe Creative Cloud,
To boosting your business with Ahrefs, Semrush, and AdSpy,
And enhancing your productivity with ChatGPT Plus, Grammarly Premium, and more…
You get real value, real access, and now — real rewards.
Get 5% Cashback on Every Order!
That’s right — every time you buy, you earn. Use your cashback on your next tools, accounts, or subscriptions. No points. No gimmicks. Just real money saved.
Why Thousands Trust SilkLinks.online:
✅ Instant Delivery
✅ Top-Tier Digital Products
✅ Tested & Verified Accounts
✅ Professional Support
✅ 5% Cashback with Every Purchase
️ Ready to upgrade your digital life?
Browse our store, grab what you need, and enjoy fast access to the tools that drive your work, passion, or side hustle.
Visit https://SilkLinks.online — Get More, Spend Less, Every Time.
Greetings,
We have made several efforts to touch base with you in order to reaffirm the discussions held regarding our project.
We would be grateful to receive your feedback as we look to move forward in furtherance of this promising business engagement.
Looking forward to hearing from you soon.
Warm regards,
PAUL CAMPBELL
Hello
Claim Your $447K AI-Powered Business Today
Access a fully built, AI-powered business valued at $447K—designed to generate up to $417.95 per sale. No tech skills or hard work required.
Interested in unlocking this done-for-you income stream?
Want in => https://rb.gy/mv6qbh
Best regards
Will
If you wish to unsubscribe, please reply to this email.
Hello
Claim Your $447K AI-Powered Business Today
Access a fully built, AI-powered business valued at $447K—designed to generate up to $417.95 per sale. No tech skills or hard work required.
Interested in unlocking this done-for-you income stream?
Want in => https://rb.gy/mv6qbh
Best regards
Roland
If you wish to unsubscribe, please reply to this email.
Hello
Claim Your $447K AI-Powered Business Today
Access a fully built, AI-powered business valued at $447K—designed to generate up to $417.95 per sale. No tech skills or hard work required.
Interested in unlocking this done-for-you income stream?
Want in => https://rb.gy/mv6qbh
Best regards
Hyman
If you wish to unsubscribe, please reply to this email.
Explore a New World of Video Creation with Ease!
Are you on the hunt for an effective way to boost your brand or product? Want to captivate a larger audience with compelling content? Look no further – our website is the ultimate solution for you!
With us, there’s no need to wait endlessly or spend a fortune on video production. We offer instant, innovative solutions through prompt and automatic technologies, delivering professional-quality videos in minutes!
From product promotions to engaging storytelling, our platform empowers you to create stunning videos effortlessly. Say goodbye to long hours of editing and hello to streamlined, impactful content creation. Dive into the future of video marketing today!
Ready to revolutionize your content creation process? Click now and unleash the power of prompt and automatic video production! Don’t miss out – your next viral video awaits! ️
https://rebrand.ly/vidauto
كيف تعمل فلوس اونلاين اضغط على الرابط https://rebrand.ly/vidauto
Hello
Claim Your $447K AI-Powered Business Today
Access a fully built, AI-powered business valued at $447K—designed to generate up to $417.95 per sale. No tech skills or hard work required.
Interested in unlocking this done-for-you income stream?
Want in => https://rb.gy/mv6qbh
Best regards
Ann
If you wish to unsubscribe, please reply to this email.
Dear Managing Director,
I am writing to introduce financing solutions tailored for enterprises seeking non-dilutive capital for expansion, M&A, or cross-border initiatives.
We enable structured funding through a network of institutional and private capital providers. Facility sizes are matched to your requirements, with long-term tenors and prompt execution.
In addition, we broker credit lines backed by institutional digital asset holdings, personalized for secure deployment and flexible terms.
Should any of these options be relevant to your capital acquisition planning, I would be glad to share further details.
Best regards,
David Mark Lee
McCullin Griffit BROKERAGE LLC
Unit 3, Balthane Industrial Estate
Ballasalla, Castletown IM9 2AJ
Isle of Man
✉ davidmark@mccullingriffit.com
✆ +44-7500-822180 (WhatsApp)
Hello
Need Help Managing Your Social Media?
Social Media Manager keeps your brand active across all platforms: Facebook, Instagram, TikTok, LinkedIn, YouTube, Pinterest, and X.
Increases visibility, and saves you time. More engagement, more growth without the daily hassle.
Do you need this service for your business? Try it now and see the difference.
Reply to this email, and I’ll be happy to share more details with you.
Best regards,
Susie
Norway, NA, Trondheim, 7042, Rosenborgkaia 21
To stop any further communication through your website form, Please reply with subject: Unsubscribe !shortcutguru.in
Hello
Claim Your $447K AI-Powered Business Today
Access a fully built, AI-powered business valued at $447K—designed to generate up to $417.95 per sale. No tech skills or hard work required.
Interested in unlocking this done-for-you income stream?
Want in => https://rb.gy/mv6qbh
Best regards
Garrett
If you wish to unsubscribe, please reply to this email.
Hello
Boost Sales Fast with Rapid Traffic Flow
Want more traffic and real buyers? Rapid Traffic Flow sends high-converting traffic straight to your site-fast, easy, and hands-free.
Perfect for boosting product visibility and increasing sales without extra effort.
Start getting real results now: https://rb.gy/bx4rvz
Best regards
Karissa
If you wish to unsubscribe, please reply to this email.
Hello
Claim Your $447K AI-Powered Business Today
Access a fully built, AI-powered business valued at $447K—designed to generate up to $417.95 per sale. No tech skills or hard work required.
Interested in unlocking this done-for-you income stream?
Want in => https://rb.gy/mv6qbh
Best regards
Glory
If you wish to unsubscribe, please reply to this email.
Greetings,
We are a team of seasoned financial managers actively seeking strategic collaborations with project owners who present well-structured proposals with strong return on investment potential. Our mission is to support and partner with ventures that are positioned for sustainable financial success.
If you have a project that aligns with these objectives, we would be pleased to explore the possibility of working together. Should your project demonstrate compelling potential, we would be glad to arrange a Zoom meeting at your convenience to discuss the opportunity in greater detail.
We look forward to hearing from you.
Warm regards,
Paul Campbell
Привет помнишь списывались на форуме общения ? заинтересовал твой блог с новостной лентой и твои идеи, очень интересно, можно списаться, я Кира11, добавить новостей и по термеху задач, как будешь свободен, спасибо тебе еще раз.
Dear Managing Director / CEO,
I am reaching out to share financing options for companies looking for non-dilutive capital to support growth, acquisitions, or international projects.
We arrange structured funding through institutional and private sources. Terms are tailored to your needs, with competitive durations and confidential handling.
We also broker loans backed by institutional Bitcoin holdings, offering secure and flexible terms.
If either option fits your capital plans, I would be happy to provide more details.
Best regards,
Kieran Tom Nigel
Kieran Associates
Unit 3, Balthane Industrial Estate
Ballasalla, Castletown IM9 2AJ
Isle of Man
✆ +44-7500-822180 (WhatsApp)
✉ kieran@kieranassociates.com